Skip to content
3 tier concrete fountain surrounded by trees

How To Set Up A Concrete Fountain

Thanks for purchasing one of our concrete fountains. Now it's time to set it up so you can sit back and enjoy the majestic sight and sounds of gentle water trickling along your new spectacle.

Here's a guide to help you put together your water fountain and garden pond.

Initial Requirements

Tools & Equipment Required

  • Liquid nails for gluing the fountain bowls together.
  • Sponge & cup for soaking any water in the bowls.
  • 2x ladders based on the height of the fountain (or appropriate scaffolding).

If you're using a pond:

  • Mortar mixture for "gluing" the pond pieces together tier bowls on top of one another.

Assistance Required

  • We recommend 2-4 strong helpers to assist with the setup depending on the model of the water fountain.
  • We strongly advise that you consult with a landscaper to help. If at any stage you're unsure, please consult your landscaper.

Prepare The Foundation

The concrete fountain must be placed on a flat, sturdy, level surface and not on grass. Over time, grass can settle, and the ground may become unstable. There are 3 choices: hard soil, concrete pavers, and concrete floor.

You will need to take the following steps to prepare the ground:

Clear the grass

Clear away any grass and excess soil around the area you would like to place the fountain. Consider the entire region, including the size of the pond, if you're adding a pond.

Redistribute the soil

To create a level surface, use a flat spade to spread the soil evenly from higher to lower areas, compacting it until the entire area is flat.

Create a hard surface (optional)

This step is optional. You may place concrete pavers around the area, which any purchase from any good hardware store. Or you can pour cement over the entire region.

Garden Pond Option

  • If you're using a garden pond with your concrete fountain, the pond pump will sit in the pond near the pedestal. See the blue circle in the picture below.
  • If you're using the fountain as a stand-alone, the pump will sit in the pump housing where the largest bowl meets the pedestal. See the red circle.

    Pre-Setup

    Test The Water Feature Pump

    Before erecting your fountain, we recommend you test the pump and hose first to get a feel for its operation.

    • Connect the hose to the pump and the other end to a small water-filled bucket.
    • Switch the pump on and adjust settings to get a feel for the level of power/pressure.

    Set The Fibreglass Liner (Optional)

    If you've purchased a fibreglass liner, now is the time to put that over the soil/concrete. The fibreglass liner also acts as a floor support and a template to guide the pond pieces together to form the pond.

    There is concern over the visual appearance of the liner being shorter in height than the pond. It's not a problem as the fibreglass liner is not so visible when looking at a distance at a pond filled with water.

    Supporting The Pedestal

    To house the pump, you'll need to place two supporting blocks below the fountain's pedestal of about 20cm in height. We recommend 20cm in height to cover the height of the pump. There are a few reasons for this:

    1. Provide room underneath the fountain's pedestal to prevent its weight from crushing the hose.
    2. While the pump's placement in the pond is flexible, it should be positioned directly beneath the pedestal to shield it from potential damage caused by prolonged exposure to sunlight.
    3. Placing supporting blocks under the fountain's base helps elevate it for a fuller view. This is important when a pond surrounds the fountain, as the pond may conceal the lower portion of the pedestal from a distance.

    Set Up The Concrete Fountain

    Setting Up Catalina Fountain

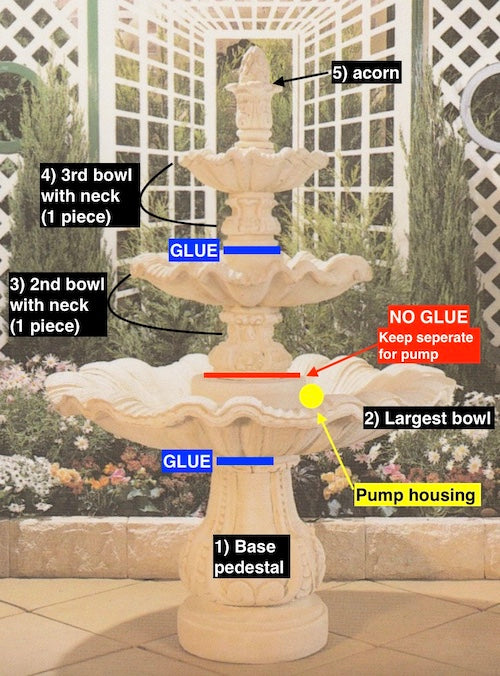
    To demonstrate, we'll be setting up the Catalina 3-Tier Concrete Fountain.

    It's best to wait a day for the pedestal and first bowl to set before continuing with the remainder of the fountain the next day. You may also structure this in two parts, morning and late afternoon. However, we advise splitting the work into two days for colder days.

    STEP 1: Pedestal Base & First Bowl (Day 1)

    If you're using a pond, please ensure you've placed the fibreglass liner onto the ground before proceeding.

    Erect The Base & Largest (First) Bowl

    1. Sit the base pedestal on the floor.
    2. Place the first bowl onto the pedestal. You may need 2-3 men to assist with lifting.

    Level The Fountain Bowl

    1. Fill the first bowl with water.
    2. Gradually rotate the bowl until the water is evenly distributed and balanced. Note: we recommend doing this over using a spirit level.
    3. Once the bowl is balanced, you may leave the water or use the sponge/cup to remove it for the next step.
    4. Two persons are to tilt the bowl slowly to one side while having a helper place liquid nails onto the join (top of the pedestal). Continue in this manner, moving slowly around the join until the join is fully glued.

    Notes:

    • Liquid nails are easier to work with than cementing with mortar, but the latter gives the water fountain a nicer finish. Your landscaper will be able to discuss the best option with you.
    • If you use mortar, ensure none gets inside the tubing during cementing.

    Note if using a pond: At this stage, feed the tubing through the pump housing to the pedestal base. Then connect the tubing to the pump and let the pump sit on the pond liner near the pedestal.

          STEP 1B: Using The Pump Housing

          This section is only applicable if you're not using a pond. In this case, the pump sits in the pump housing at the first bowl.

          Drilling The Pump Housing


          A concrete pump housing with water pump.

          In the above pump housing there are two holes. The red-circled hole to the left is for water to pump out to the large bowl. Please ignore the wire protruding from the hole. Do not put wires through it.

          There is a plastic-like bottom, and you'll need to drill a hole in its centre (blue circle). There may be some concrete at the back of the plastic. It's OK to drill through that concrete.

          Note: If you've ordered a pond, the pump housing will be pre-drilled.

          A fountain pump sitting inside a concrete pump housing.

          Prepare The Water Pump

          Please remove the pump's filter; otherwise, the pump will not fit inside the pump housing.
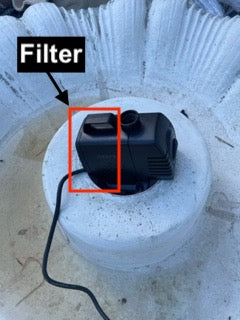
 (Note: if you use a pond, the pump sits inside the pond, and you don't have to remove the filter).

          You may let the pump's cord overhang the largest bowl. Or, if you prefer a cleaner look to hide the wiring, you can do the following:

          1. Use a hand grinder to create a tiny opening at the side of the pedestal base so the wire can go out to one side.
          2. Cut the pump's cord near the plug. Then feed the wire through the hole of the largest bowl down the pedestal's opening at the base. Afterwards, rejoin the wire with the plug. 
          3. Seal off the hole at the bowl with silicon or liquid nails so water cannot escape the hole.
          4. Reposition the pump within the pump housing, then connect it to the tubing.
          5. Test the pump powers on OK. Then switch it off, as you don't want the pump running dry.

          Internally, all our concrete fountains have a cylindrical centre that extends vertically from the tip to bottom pedestal for the wiring/tubing to pass through.

          STEP 2: Pump, Middle & Top Bowl (Day 2)

          Second Bowl

          1. Sit the second bowl onto the neck of the first bowl while feeding the tube through. (Do not glue this join). You may need to set up a ladder for this.
          2. Put water onto the bowl and level as above.
          3. Once you've levelled the bowl, glue it onto the neck of the first bowl.

          Note: It's essential not to glue the second bowl onto the first, as you will need to lift the second bowl from time to time to access the pump.

          Top Bowl

          1. Lift the third or "top" bowl to place onto the neck of the second bowl while your helper feeds the tube through. You may need to set up two ladders for this.
          2. Put water onto the bowl and level as above.
          3. Once you've levelled the bowl, glue it onto the neck of the first bowl.

          Repeat the previous steps as required for water features with four or more tiers.

          Fountain Topper

          1. Place the fountain topper onto the top bowl while a helper feeds through the remaining tube. Then glue the topper onto the third bowl.
          2. Cut the excess tubing at the top, so it doesn't protrude from the topper.

            SET THE POND & FIBREGLASS LINER (Optional)

              A white concrete fountain pond.

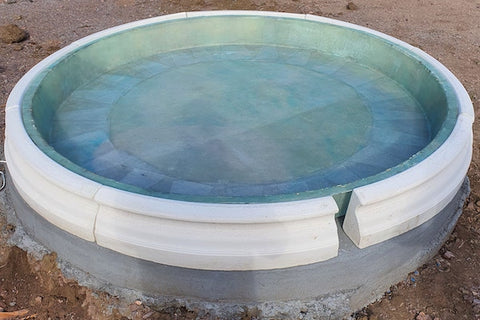
            After you've erected the water feature onto the pond liner, it's now time to cement the concrete pond pieces together.

            1. Ensure you've spaced out the pond pieces equally. Please note this needs to be done in the above picture.
            2. The pond pump's cord goes over the liner and through one side of the pond opening.
            3. Place the mortar mixture on the edges of the pond pieces and put them around the pond liner.

            The fibreglass liner acts as the template to guide the pond pieces. If you're not using a pond liner, ensure you measure appropriately to place the pond together in a circular manner. 

            Final Steps

            Ensure you leave enough time for the mortar and cement solutions to dry.

            1. Clean the fountain with water to remove any excess dirt residue. A garden hose spray is helpful for this.
            2. Continue with cleaning the pond.
            3. Connect the pump's cable to the power outlet.
            4. Fill the pond and fountain bowls with water.
            5. Switch the pump on, and viola! Sit back and enjoy the tranquil sounds of your new water feature.

            Congratulations, you have successfully set up your concrete water fountain! We would appreciate it if you took some pictures and sent them to us at hello@fountainland.com.au to see how you've done.

            FAQs

            Can I drill a hole into the pond liner?
            No. We recommend you don't do this to avoid damaging the liner's integrity. It's also difficult to seal the liner afterwards.

            How often do I need to refill the water for my fountain?
            Large water fountains, e.g. Catalina: summer at 4 times per week, winter 2 times per week. If using a pond: summer 2 times per week, winter 3 times per week.

            Extra large concrete fountains, e.g. Frangelico: 3 times per week

            Should I buy the most powerful pond pump possible?
            Water usually trickles at the fountain's peak. If the pump is too powerful, water may not land properly from the fountain's peak to its top bowl. So it's not necessary to have more power. More power is needed if you're using a pond, as the water flow starts from a lower base.


            Previous article How Do Water Features & Pumps Work?
            Next article Buying & Setting Up Your Modern GRC Water Fountain